Posted in Dinner, Food, Lunch, Review, San Francisco, Street Food, Tips, Travel

Food Adventures in Chinatown

Roasted meats in the window of Kam Po Kitchen in SF Chinatown.

Back when dinosaurs roamed the earth, popular Asian supermarkets like 99 Ranch, Marina, or HMart didn’t exist. But Chinese food did, and as a home cook, you needed to go somewhere to find all the “foreign” produce and supplies you needed to make a decent Chinese meal at home. So my family and I traveled to San Francisco’s Chinatown every Saturday afternoon from the suburbs to do just that. That tradition of sorts continued every weekend into my early teens, and I haven’t really been back regularly since. You see, all the popular, modern, and frankly better Chinese restaurants planted themselves either outside of Chinatown or even outside of S.F. altogether, following younger, newer immigrants into the suburbs who wanted bigger houses and better schools. And with items like bok choi and ramen easily accessible at almost any neighborhood grocery store, Chinatown got a bit left behind. That’s why you’ll see either tourists (Grant Ave.) or older Chinese folks (Stockton St.) in the area these days. And to be honest, if you’re looking for exceptional Chinese food, you won’t find it here.

However, I was recently inspired to scope out some notable exceptions. So I dragged my family and friends to Chinatown for a short food crawl. After visiting a few bakeries, dim sum shops, and the like, we had two clear cut winners. (And Golden Gate Bakery was not open, so no classic Egg Tarts this time around. 😦 )

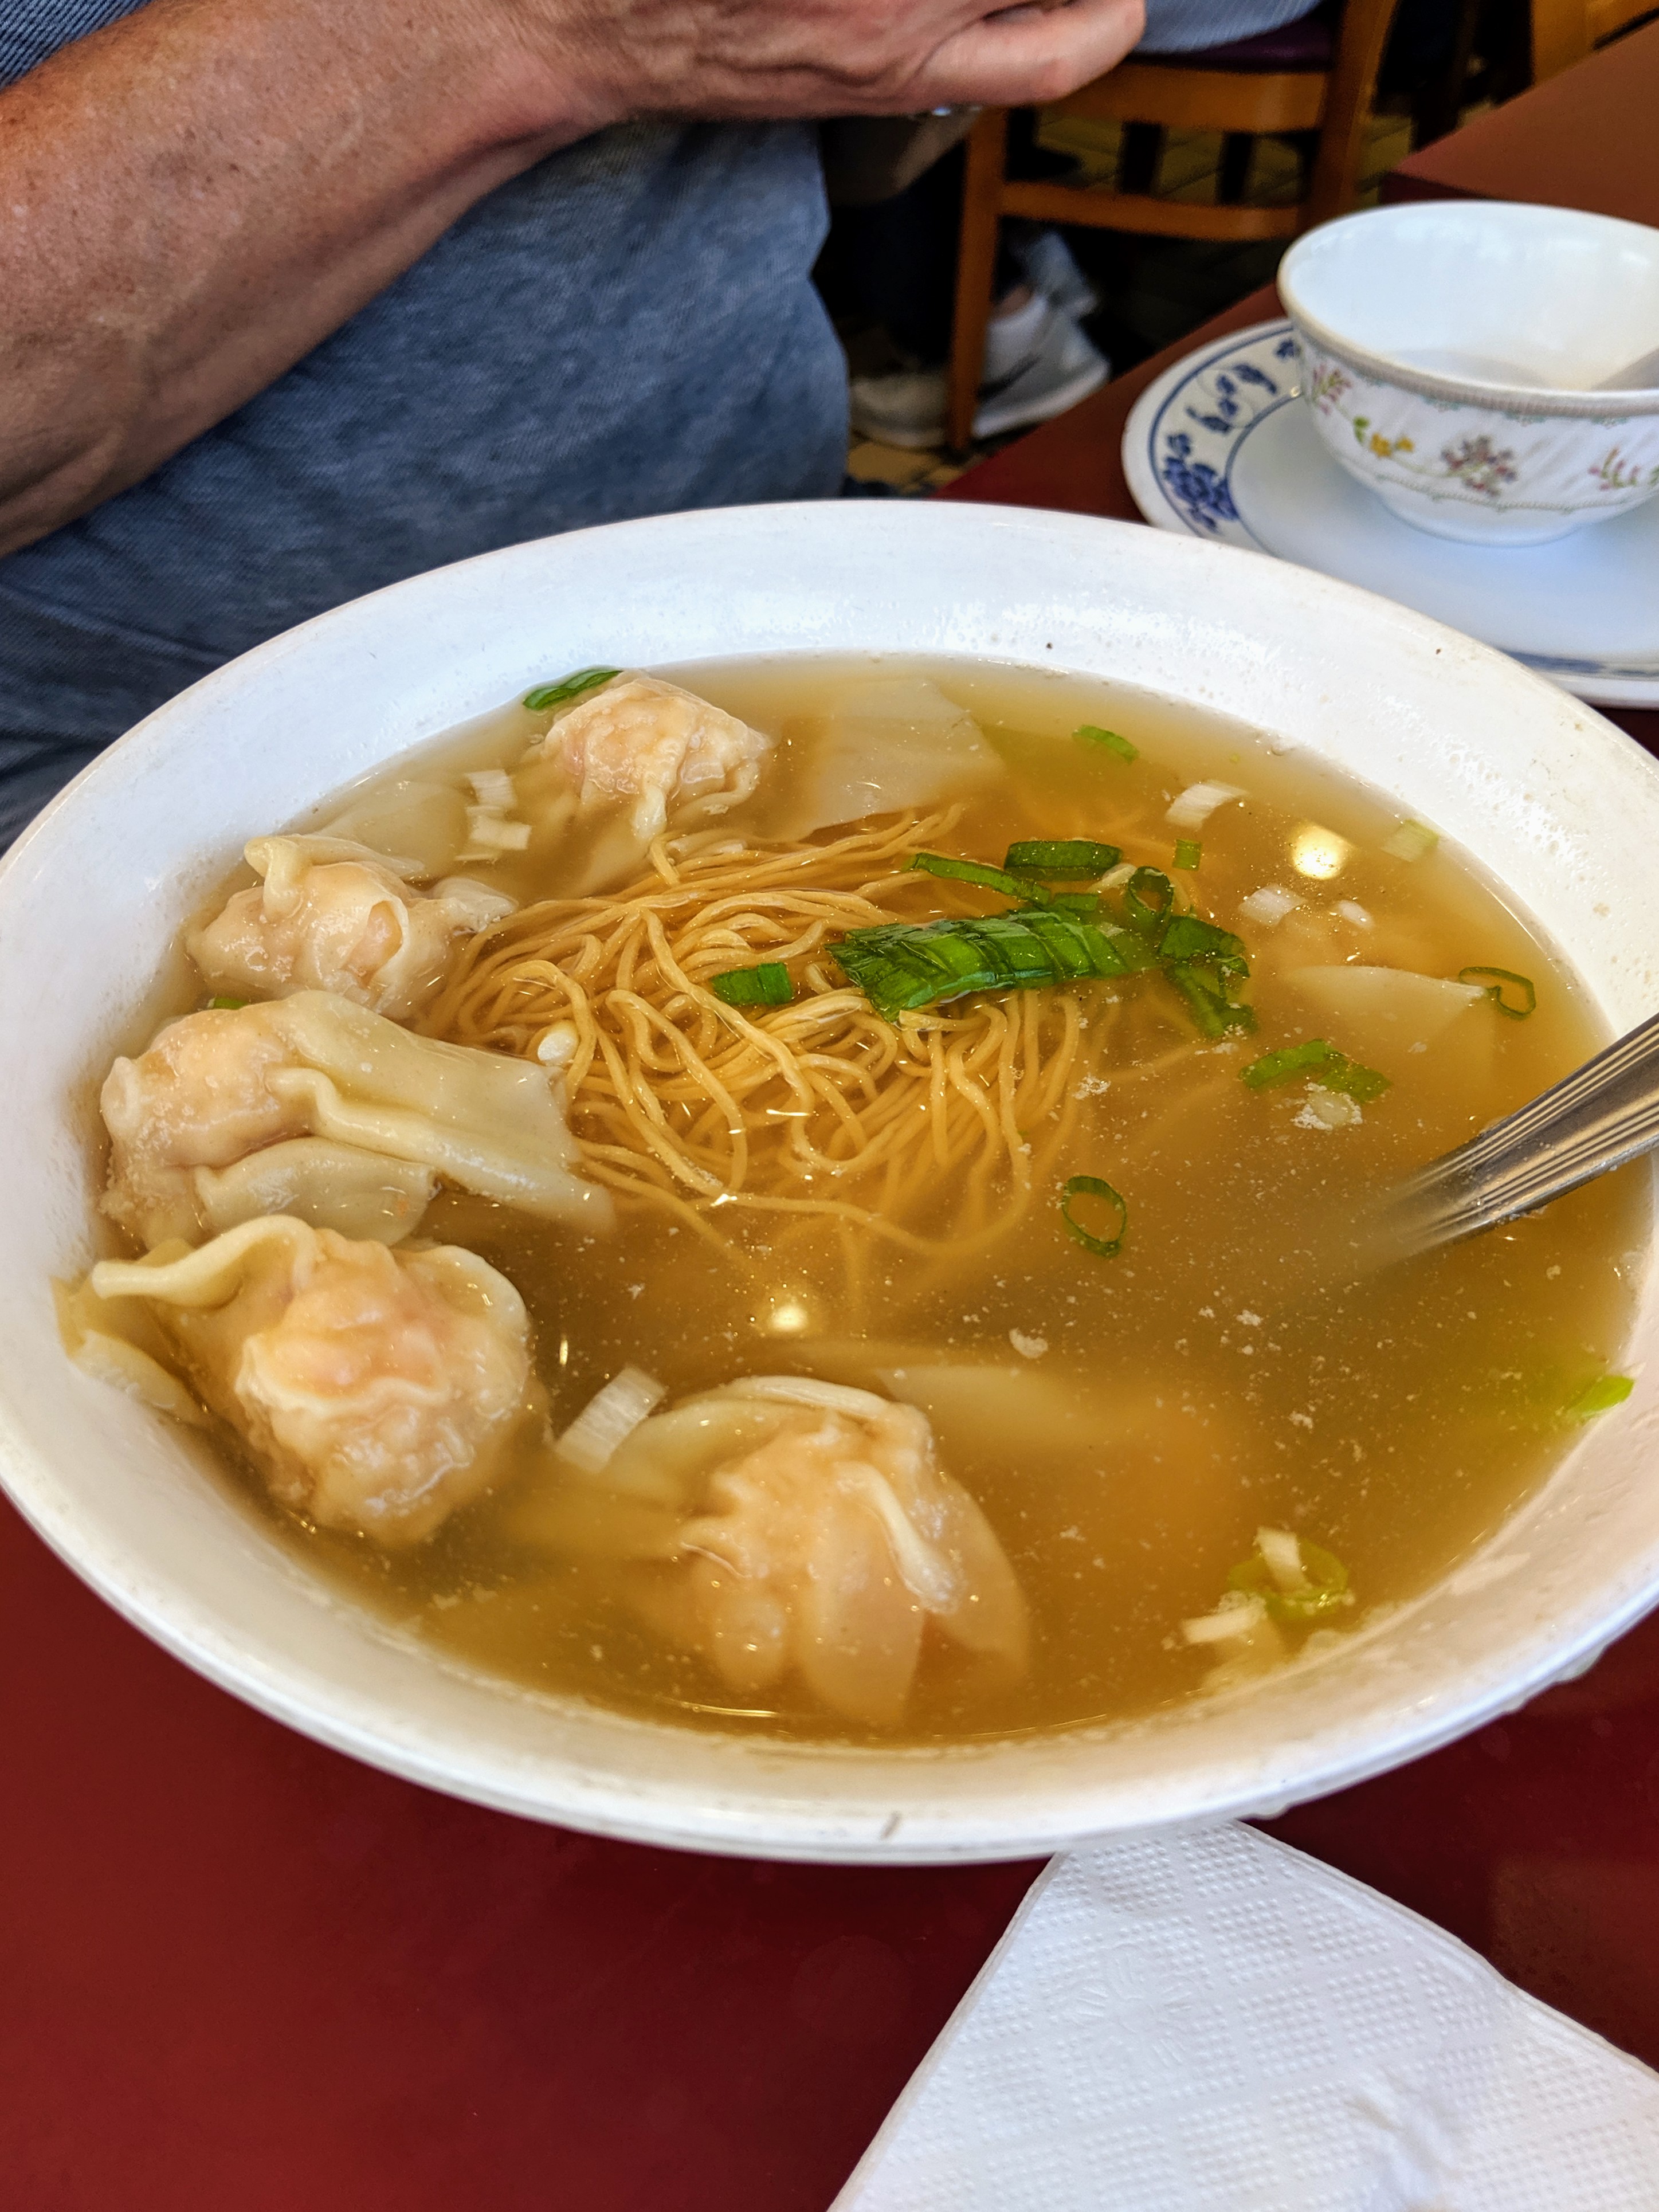
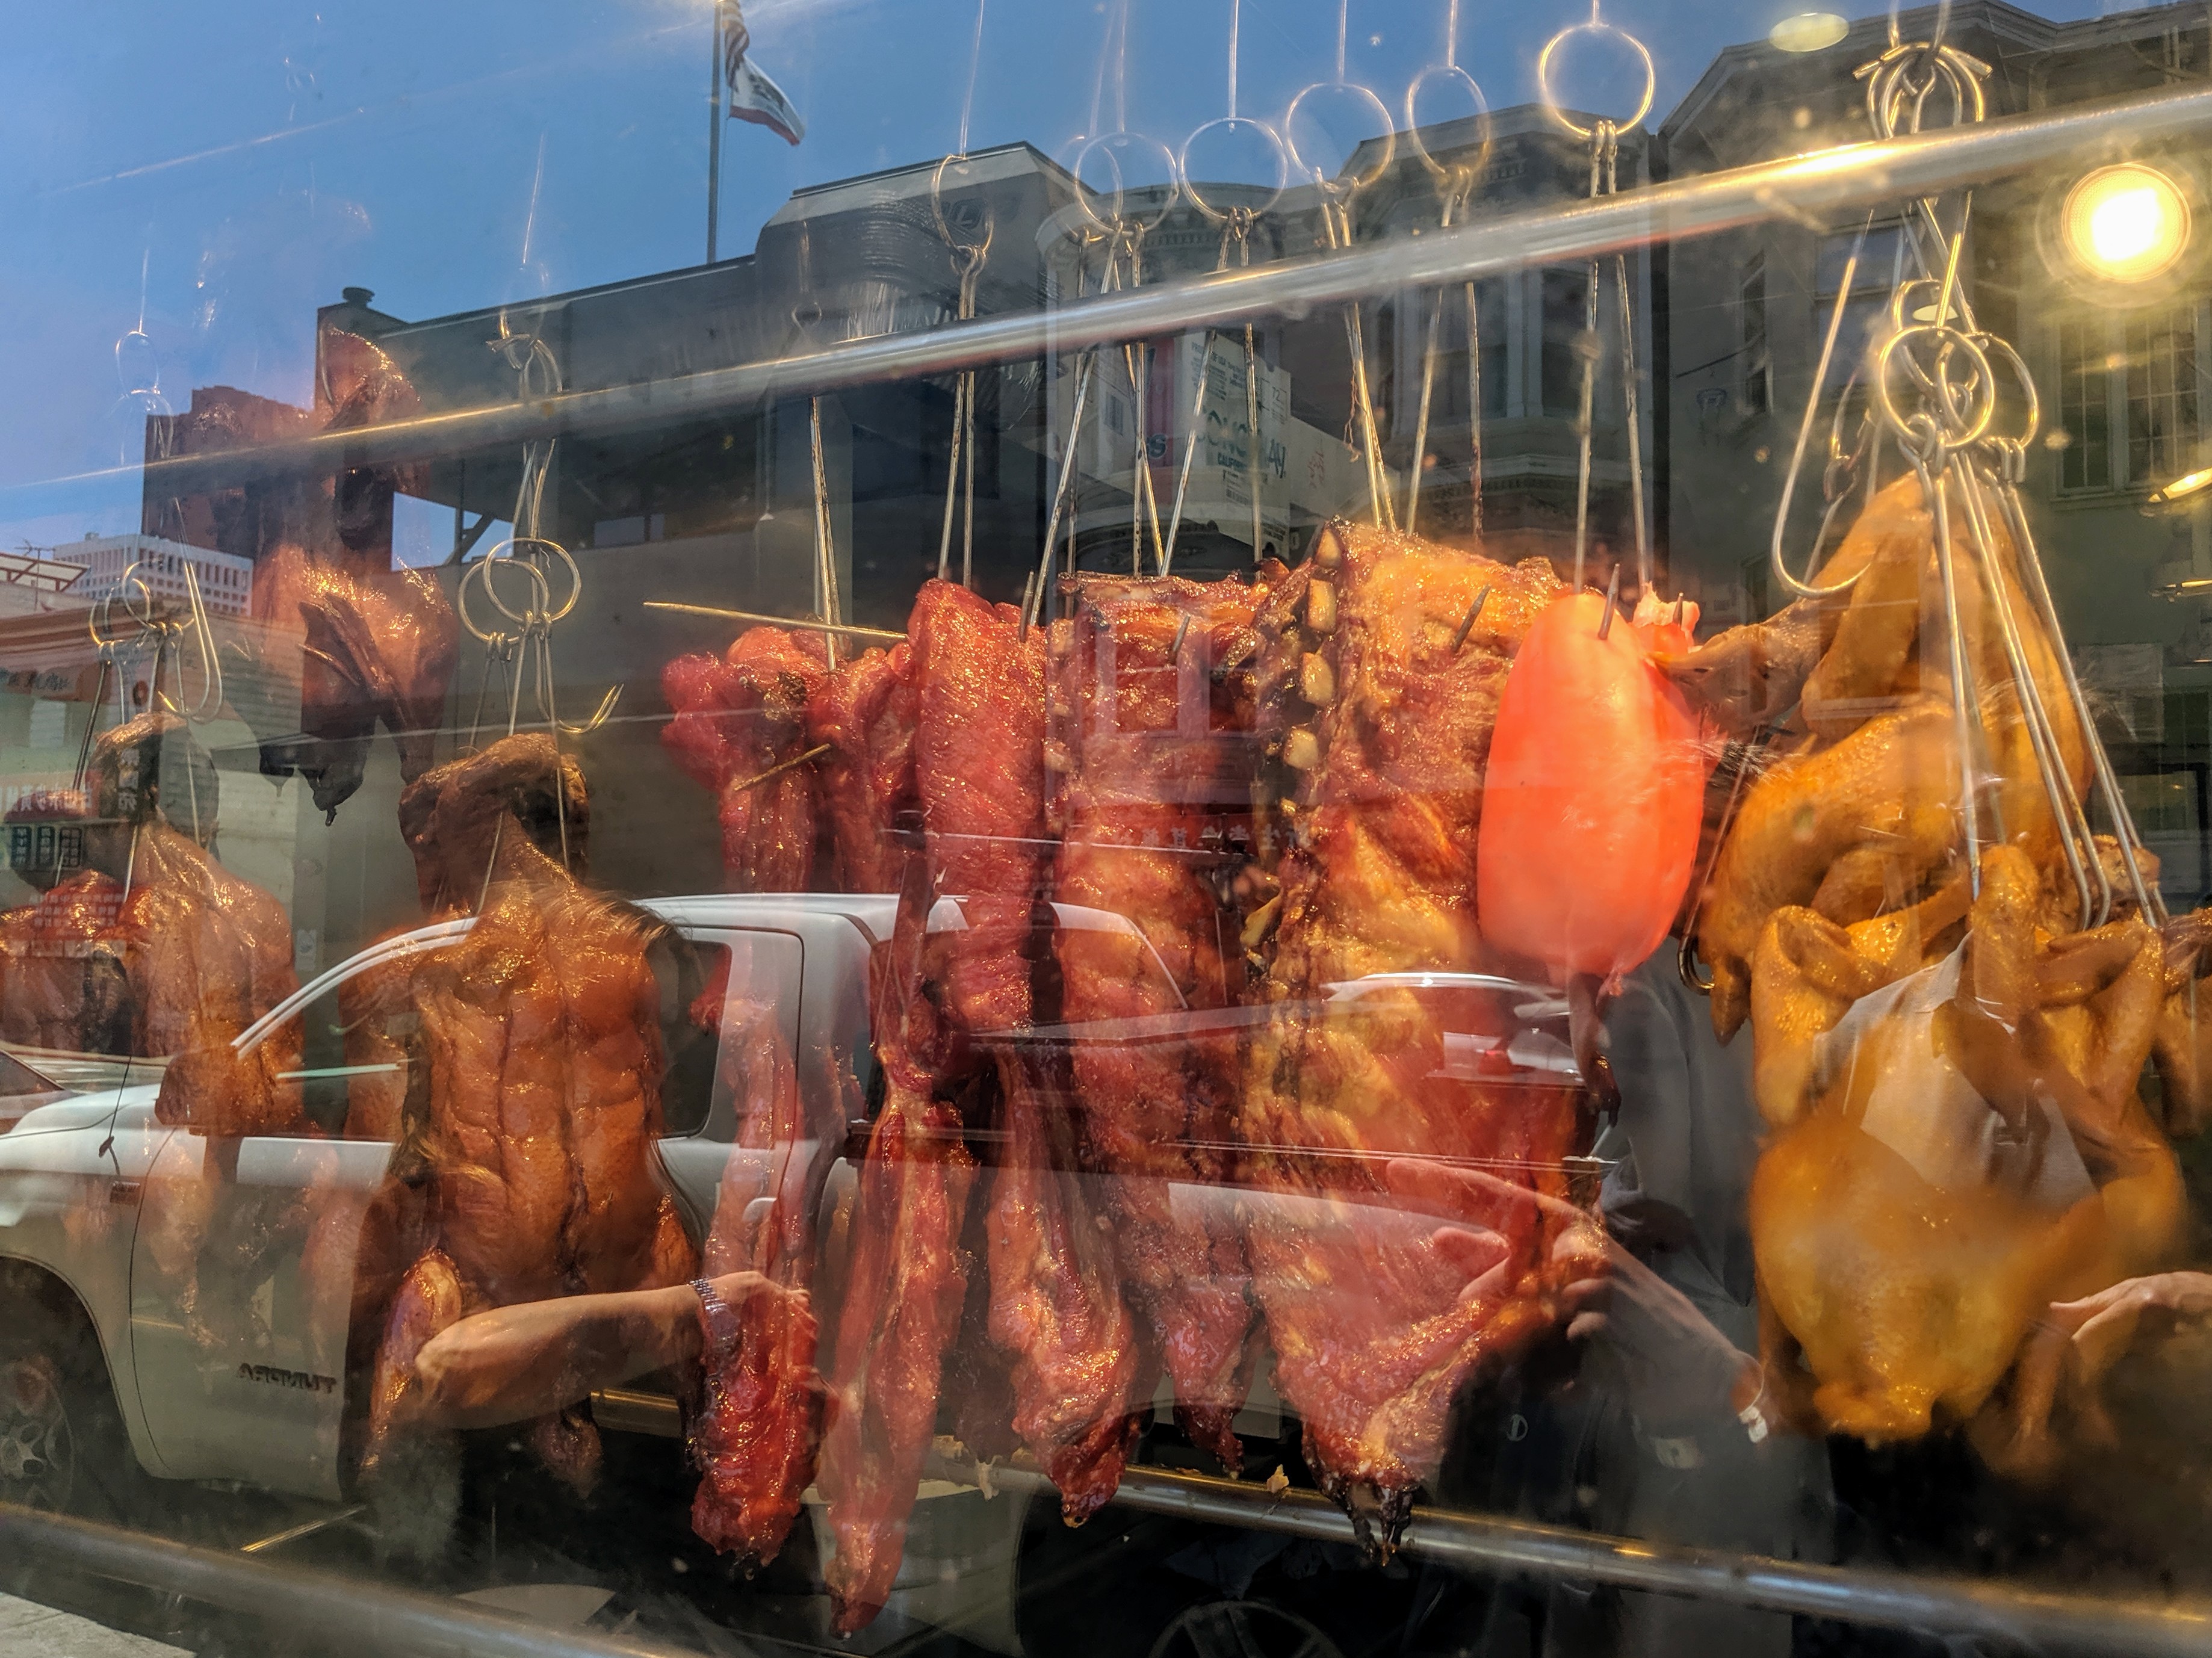
We LOVED Kam Po Kitchen (801 Broadway & Powell in San Francisco). Why? Just look at the pics! Beef Chow Fun, Wonton Noodle Soup, Hong Kong Style (crispy) Tomato Beef Chow Mein, Gai Lan (greens) with Oyster Sauce, and some exceptional Roast Duck made for a terrific traditional Cantonese lunch. I equate places like this, where they have roasted meats hanging in the window, to a Chinese deli. The food is casual, unfussy, affordable, comforting, and delicious. Ironically, places that do this type of food well are not as easy to find around the Bay Area anymore. We also spotted locals lining up out the door to grab some roasted meats to go. If you’re in the area, skip the kitschy tourist traps on Grant Ave. and head up here. It’s worth it.

Various goodies from Dim Sum Bistro

If you’re wanting some grab and go dim sum, Dim Sum Bistro (675 Broadway St, S.F.) was our favorite of the places we tried. They had fresh, tasty items like Steamed Chive and Shrimp Dumplings, Shrimp & Pork Siu Mai, Sesame Balls filled with sweet red bean paste, and my childhood favorite, White Sugar Cake (which is really hard to find these days). Seating is very limited, and frankly, you’d be better off just getting it to go instead. It’s crowded and there’s nothing in the way of ambiance here.

The Chinatown of my childhood really hasn’t changed much. And in the case of these delicious delicacies, that can be a very good thing.

Posted in Dinner, Food, For Kids/Parent, Recipes

Recipe: Marinated Mushrooms

I don’t usually post recipes but I’m thinking I might start to from time to time. This recipe is adapted from a blog called Cooking Melangery. I got inspired so I decided to make these as a side dish to my Roasted Lemon Chicken for dinner recently. The results were excellent! I love that wonderful vinegary flavor, and it’s a great change of pace to regular sauteed mushrooms. I also got some fresh mushrooms from the farmers market, so that only added to how tasty they turned out.

2 lbs. button or cremini mushrooms, quartered and cleaned
1/4 cup olive oil
1/4 tsp. dried thyme
2 green onions, chopped
2 cloves garlic, sliced thin
1/3 cup red wine vinegar
1/2 tsp. salt
1/4 tsp. black pepper

Heat a saute pan over medium high heat and add olive oil. Add green onions and garlic to the pan and saute about 1 minute. Add in mushrooms and the salt and pepper. Saute about 3 minutes.

Add in the vinegar and dried thyme. Stir through and cook for another minute.

Take off the heat and let cool to room temperature. Serve. Makes enough for about 4-6 people as a side dish.

Posted in Dinner, Food, For Kids/Parent, Recipes

Gluten Free Oven Fried Chicken

Fried chicken

My gluten free husband hasn’t had real fried chicken in AGES. I’ve made breaded chicken but using almond meal instead of breadcrumbs. It’s surprisingly good, but it’s not fried chicken. And flavoring just the breaking doesn’t do the trick because then your meat isn’t flavorful.

Enter this recipe which is a take off Ina Garten’s. I’ve made some changes with flavoring and measurements. And you’ll notice I use only dark meat. They cook up juicer and is much more forgiving in terms of cooking time. If you choose to use white meat, don’t use boneless meat and remove from the oven about 5-10 minutes sooner.

Its crispy, crunchy, juicy, flavorful fried chicken goodness. Whether you’re gluten free or not, this is the best oven fried chicken recipe I’ve ever made. This recipe is definitely a keeper!

6 chicken legs, separated thighs and legs
1 1/2 cups buttermilk
1/4 cup brown mustard

2 cups gluten free breadcrumbs
1 tsp. Salt
1 tsp. Herbs de Provence
1 1/2 tsp. Garlic powder

Preheat oven to 385F degrees on convection roast, or 400F.

Mix buttermilk and mustard together in a large bowl and submerge all the chicken pieces, including under the skin. Marinade at least 2 hours, preferably overnight.

Mix all remaining dry ingredients in a shallow dish or loaf pan. Dip chicken pieces in the dry mixture and place on a parchment lined sheet pan. Bake 25 mins, then flip the pan and bake another 20 mins.

Remove from oven and let cool 10-15 mins. Serve. Makes enough for 5-6 people.

Posted in Dinner, Food, Lunch, Peninsula, Recipes, Review, Travel

Cremini Mushroom & Leek Soup

The soup in question.

I had a lovely lunch recently at a newish restaurant in San Carlos called Johnston’s Salt Box that consisted of a phenomenal Green Curry Steak Sandwich and a light yet hearty Mushroom Leek Soup.

After all the traveling I’ve done in the last few weeks, that soup was just what I needed. It was earthy yet fresh and felt comforting yet new. It’s rare to find mushroom soups that aren’t filled with cream. My husband and I spent the rest of the afternoon trying to dissect the soup, including its nuances.

I think we came pretty damn close. Served with some crusty fresh bread and sweet cream butter, this was the best post-travel supper to both make AND eat.

Cremini Mushroom & Leek Soup
12 oz. sliced cremini mushrooms
2 leeks (light green and white parts only), cleaned and chopped
2 carrots, peeled and diced
4 cups chicken stock
1/4 tsp. dried thyme
Zest of 1/2 a lemon, grated
1 Tbsp. butter
Olive oil
Salt and Pepper

Heat 2 Tbs. olive oil over medium heat in a Dutch oven until it shimmers. Sauté carrots for about 3 mins. Add in mushrooms and a pinch of salt to draw out their moisture, and sauté another 7 mins. Until softened but not soggy. Empty the mixture into a bowl and set aside.

Melt the butter in the same Dutch oven over medium high heat and add the leeks, along with a pinch of salt and pepper. Sauté until softened, about 5 mins. Add back the mushroom/carrot mixture along with any juices, the dried thyme, the chicken stock, and 1/4 tsp. salt. Bring up to a boil and simmer for 20 mins.

Turn off the heat and stir in the lemon zest. Season additionally to taste if necessary. Pour in a nice dash (about 1-2 Tbs.) of good extra virgin olive oil. Serve immediately with some fresh bread. Serves 4-6.

Posted in Dinner, Food, For Kids/Parent, Lunch, Recipes

Slow Cooker Lentil Tomato Stew

This Lentil Tomato Stew doesn't photograph so pretty, but it's damn tasty!
This Lentil Tomato Stew doesn’t photograph so pretty, but it’s damn tasty!

It’s been WAY too long since I last wrote on this blog. But my impetus for this entry is, of course, food. This time is a ridiculously simple but hearty stew that’s naturally vegetarian/vegan (if you use veggie stock or broth), gluten and dairy free, high in protein and fiber, and low in fat . And if it tasted too healthy and bland I wouldn’t be writing about it, so trust me on this.

I’ve been making lentil soup for years and frankly, the idea of making another pot of the stuff bored me. But I remembered a pot of lentil stew that one of my former roommates during my college years made without the usual mirepoix of carrots and celery. Could I throw a bag of lentils, some diced tomatoes, and some spices into a slow cooker, have it be done by the time I get home from work, AND actually taste like something I’d look forward to eating?

YES! This stew is awesome! It goes great with rice or with a nice crusty piece of bread. Easy, delish, good for you = the trifecta. Voila!

Slow Cooker Lentil Tomato Stew
16 oz. green lentils, uncooked
One 16 oz. can crushed tomatoes or tomato sauce
One 16 oz. can petite diced tomatoes
1 medium yellow onion, chopped
3 cloves garlic, minced
1 tsp. ground cumin
1 tsp. dried thyme
1 bay leaf
1/2 tsp. kosher salt
4 cups of chicken or vegetable broth
1/2 tsp. red wine vinegar (optional)

*Place all the ingredients in a slow cooker and cook on high for 5-6 hours. This should make a good amount of stew (around 6-8 servings). Stir in vinegar to finish just before serving. Serve alone, with rice, or with some nice crusty bread. 

Posted in Dessert, Dinner, Events, Food, Lunch, Review, San Francisco, Travel

Hottest Food Trends from the 2014 Winter Fancy Food Show

The Winter Fancy Food Show is known as the food industry’s most happening trade show, where new food trends are introduced months before they clog supermarket shelves. At this year’s event, for example, there was no shortage of bacon-infused snacks, gluten-free products, and Sriracha-flavored everything—all trends from past years that have now gone mainstream.

Here are eight different food products from this year’s show that are sure to be coming to a supermarket near you—and soon!

Brussels sprouts

Brussels Sprouts

Move over kale chips. Everyone is taking one of the most polarizing dinner table veggies and turning them into flavorful, crispy chips and snacks. I’ll admit, I’ve always hated Brussel sprouts. But after trying some of these snacks, I think I can be converted.

artisan popsicles

Artisan Popsicles

Combinations like hibiscus mint and watermelon agave are nothing like your childhood Otter Pops. Inspired by Latin American paletas, which are basically fresh fruit popsicles, the folks at GoodPops decided it was time to bring that concept to mainstream America, using high-quality ingredients and inventive flavor combinations. After tasting them myself, I think they’re making a good case for it.

mocktails

Mocktails

If you’re like me and can’t drink alcohol for whatever reason (it’s a cruel fate, what can I say), you always feel like you’re s**t outta luck at cocktail parties and other gatherings. Not if the company Sociale has its way. Sociale makes virgin versions of the cosmopolitan, mojito, margarita, and martinis that taste like the real thing. These bottled mocktails are quality, all-natural drinks that taste like a great cocktail should.

almond water

Almond Water

Almond milk + coconut water = almond water! Almond water has the clean, refreshing finish of coconut water, with the subtle flavor of almonds. It’s not cloyingly sweet or overpoweringly filled with vanilla essence. The recipe from the brand Victoria’s Kitchen is from the owner’s French grandmother. It’s floral and light, and the branding looks like something out of an old-timey apothecary. I was ready to take a case home with me.

hummus

Hummus…Minus the Chickpeas

Fava beans, lentils, carrots, edamame, white beans, and black beans all took turns as the main ingredient in a variety of new hummus dips. Surprisingly, they were all quite good with subtle yet distinctive flavor differences compared with the original chickpea version. They also tout a bunch of different health benefits (the fava bean and edamame versions, in particular). The fava bean hummus from FavaLife and wasabi edamame version from Eat Well Enjoy Life were my personal favorites.

Cookie chips

Cookie Chips

Cinnamon sugar cookies, chocolate chip cookies, and decadent brownies are some of America’s favorite sweet treats. But several companies have decided what’s really been missing is a certain amount of crunch. Enter cookie and brownie chips. With a variety of different names, depending on the maker, they all combine the light crispy crunch of a chip with the sweetness of a brownie or a cookie. Snackers with a major sweet tooth can now rejoice.

half-ppped popcorn

Half-Popped Popcorn

Hate the unpopped kernels of popcorn at the bottom of the bag? Well, the folks who make Pop’d Kerns apparently decided to do something about it. It’s not fully popped popcorn, nor is it an inedible unpopped kernel. It’s basically a popcorn kernel that’s half-popped. It’s got more heft and crunch than regular popcorn, but still has that familiar flavor. Think of it as a cross between popcorn and Corn Nuts.

chocolate tea

Tea for Dessert

Now you can have your dessert, and drink it too. Apparently it’s not enough to enjoy a piece of chocolate with your afternoon tea anymore. Popular tea makers have now infused cupcake, Bundt cake, and even chocolate flavors into their teas. Thankfully, none of them are overly sweet or obnoxiously flavored, though tea purists are sure to turn their noses up at this trend.

Posted in Dinner, Food, Lunch, Recipes

Chili Rubbed Flank Steak with Chimichurri Sauce

imageSometimes, I still manage to surprise myself. Take for instance this dinner I made recently. I’ve made this flank steak recipe before from Martha Stewart Living, but I did a couple of things differently this time.

I took the meat out of the fridge and placed the rub onto the meat. Then, I let it sit there both to marinade and to let the meat come up to room temperature. This will help the meat cook more evenly. I also made sure I let it rest for a good 10-15 minutes after I took it out of the oven, before slicing.

For the chimichurri sauce, I made it ahead of time and refrigerated it at least a few hours before using it. It needs it because those flavors need to meld and mellow out a bit before you use it. I was never into chimichurri sauce until I had it recently on a steak salad. The tang from the vinegar, the herby freshness of the parsley and oregano, and the punch of the garlic really made an impression on me. So much so that I was compelled to make this meal. And it blew me away at how well it turned out and how awesome it tasted. I’d pay good money for a meal like this at a restaurant. Fortunately with this recipe, I didn’t have to.

None of it is tough to make, so don’t be intimidated. Just make your sauce the day before and you’re good to go. You’ll have dinner on the table in 30 minutes, flat. If you don’t have time to marinade the meat, it’s not a deal breaker. It’ll still be delicious. Serve it with rice, or tortillas to make into tacos. Leftovers are great for salads and sandwiches, too.

Chili Rubbed Flank Steak (from Martha Stewart Living)

1.5 – 2 lbs. flank steak or flap meat
1 Tbsp. sugar
1 Tbsp. chili powder
1/2 tsp. salt
2 Tbsp. vegetable oil

Combine the sugar, chili powder, and salt in a small bowl. Set aside. Remove the meat from the fridge and place on a foil lined cookie sheet or jelly roll pan.

Coat 1 tablespoon oil on each side of the meat. Sprinkle generously the dry rub mixture onto each side of the meat. Make sure you rub it in well and coat all areas. Set the meat aside and let it marinade and come up to room temperature for about an hour.

Turn your oven’s broiler on and place the meat under the broiler, about 4 inches away from the broiler, for about 12 minutes for medium rare. Do not flip the meat.

Remove from the broiler and let rest for 15 minutes. Slice against the grain and serve with the following sauce on the side.

Chimichurri Sauce

2 cups fresh flat leaf/Italian parsley, most of the stems cut off
3/4 cup olive oil
3 tsp. dried oregano
4 cloves garlic
1 tsp. salt
1/4 cup red wine vinegar

Place the parsley, garlic, oregano, salt, and vinegar in a blender or food processor and blend for about a minute until everything is well chopped and incorporated. You may have to scrape down the sides and blend again for a few seconds.

Then, add the oil in a steady stream while blending. Place the sauce in an airtight container And refrigerate for at least an hour, preferably overnight, to let the flavors meld together. This sauce should keep for 1-2 weeks in the fridge.

Posted in Dessert, Dinner, East Bay, Food, For Kids/Parent, Lunch, Peninsula, Recipes

Simple Cranberry Jam (Sauce)

Image

Cranberry sauce is used/eaten like jam at our house. It’s cooked up in batches and used on everything from the Thanksgiving bird to toast every morning for the next several weeks. It’s also eaten with peanut butter and poured over ice cream. It’s pretty versatile. That’s why I hesitate just calling it “cranberry sauce.” It’s very limiting.

I decided to start this season’s batch early because I wanted one less thing to do for Turkey Day, and it keeps in the fridge for about 2 weeks anyway. The second jar went straight into the freezer for later use.

This recipe is so easy to make, so reliably delicious, that my official taste tester (my 4 year old) grabs a bowl of it every time it’s fresh off the stove.

And remember, it’s not just for Thanksgiving anymore.

Simple Cranberry Jam (Sauce)

– 2 twelve ounce packages of fresh cranberries. If frozen, thaw before using.

– 1 cup granulated sugar

– 1 cup water

Combine all ingredients into a saucepan and let it come up to a boil over medium high heat, stirring frequently to prevent the sugar from burning on the bottom and sides of the pan. The cranberries will pop and hiss as they get hot.

20131117_201407Then, turn down the heat and simmer on low for 20-25 minutes. Continue to stir occasionally to prevent burning and sticking. Once the mixture is shiny and coats the back of your spoon, it should be done. It will continue to thicken slightly as it cools.

ImageLet it cool for 30 minutes or so before placing into a tupperware, bowl, or mason jars for freezing/storing. It should keep for 2 weeks.

Posted in Dinner, Food, For Kids/Parent, Recipes

Homemade Chinese Roasted BBQ Pork (Char Siu)

I’m so proud of myself.

All these years I’ve been hitting up Chinese delis for mediocre Chinese BBQ pork that’s been dyed a truly frightening shade of pink, or making due with tough and flavorless meat. All these years…and I could’ve been making it at home.

I was inspired by this recipe I found on the blog Appetite for China. The recipe seemed so easy. Too easy. But easy enough for me to try without fear of failure. At the very least it would be a nice slab of marinated pork belly to enjoy. I even made it gluten free by removing the hoisin sauce (which frankly I didn’t miss) and using gluten free soy sauce.

What I removed from the oven exceeded my wildest expectations. Roasted to perfection in such a short amount of time and with minimal effort. Heck, even with two little kids running around upstairs, I was able to pull out this juicy piece of meat and make it look like I slaved over it all day:

charsiuYou have to try this recipe. Period.

2 lbs. whole pork belly, skin removed
4 Tbsp. Chinese rice wine or dry sherry
4 Tbsp. dark soy sauce
4 Tbsp. sugar
1 tsp. five-spice powder
2 Tbsp. honey

– In a large bowl, mix together the rice wine, soy sauce, sugar, and five-spice powder. Rub the pork belly with the marinade mixture and marinate for 2 to 3 hours, or preferably overnight, in the fridge.

– Preheat the oven to 325°F.

– Remove excess marinade and place the pork in a roasting pan. Brush the top with the honey. Roast the pork for about 25 minutes. Flip over the pork belly slab and brush the other side with honey. Roast for another 25 minutes. The pork is done when the outsides begin to crisp up, the edges blacken a bit, and the center of the pork belly strip feels firm. (160F internal temp)

– Remove the pork from oven and let it cool for 5 to 10 minutes. Transfer to a cutting board and cut into thin slices or thicker chunks. Arrange the slices on a plate and serve.

This stuff is also great diced in fried rice, or served alongside some sauteed Chinese greens like baby bok choi.

Posted in Dinner, Food, For Kids/Parent, Lunch, Recipes

Sunday Dinner: Taco Bake

IMAG1014My husband used to wax nostalgic about something he’d have at school for lunch that had taco meat and crushed Frito corn chips in it. Don’t worry, that’s not what I made for dinner here.

So when I saw a version of this recipe somewhere, I decided to make it my own. The original recipe has refried beans and extra salsa, which I took out. I think the salsa is a bit unnecessary since there’s fresh tomatoes in it, and the beans I omitted because the beef adds enough protein. The refried beans can be full of fat. You can certainly add a can of black beans, though, if you miss that flavor.

It wasn’t my husband’s original elementary school lunch recipe, and thank goodness! We think it’s better :).

Taco Crunch Bake

1 lbs. ground beef
1 package low sodium taco seasoning
1 cup of corn kernels (canned is fine)
2 cups broken tortilla chips
2 medium tomatoes, diced
1/2 cup sliced olives
1 cup black beans, drained and rinsed (optional)
1 cup shredded cheddar
3 green onions, chopped
Plain Greek yogurt
1 sliced avocado
Shredded lettuce (optional)

Prepare ground beef with seasoning as directed. Drain well.

Line bottom of 9×11 pan with the chips. Layer the beef on top in on even layer. Follow with the corn, tomatoes, olives, then cheese. Bake at 350F for 20 minutes.

Serve with the yogurt and fresh avocado slices. Add shredded lettuce to make into a taco salad, if desired.